
DIY Wine Cabinet: Build Your Own Custom Wine Storage
Transform your home into a wine lover's haven. This comprehensive guide walks you through every step of building a beautiful, functional DIY wine cabinet — from choosing the right wood and hardware to installing custom racks and temperature control. Perfect for beginners and seasoned woodworkers alike.
Start Your ProjectWhy Build a DIY Wine Cabinet?
A well-designed wine cabinet does more than store bottles — it protects your investment, showcases your collection, and becomes a stunning focal point in your home. While professional wine cellars can cost upwards of $2,500 to $10,000, a custom DIY wine cabinet can be built for $300 to $1,200 depending on materials, size, and features. That's a significant saving without compromising on quality or style.
Building your own wine cabinet gives you complete control over dimensions, wood species, finish, and rack configuration. Whether you need a compact unit for a small apartment or a grand built-in for a dining room, DIY allows you to create a piece that fits your space perfectly. Many woodworkers also find that building custom cabinetry is a rewarding hobby that adds lasting value to their home. For those exploring broader kitchen upgrades, understanding how cabinetry integrates with overall design is key — much like planning a complete kitchen upgrade or selecting the right cabinet style for your home's aesthetic.
This guide covers everything: planning, materials, tools, step-by-step assembly, finishing, and even advanced features like wine glass racks and temperature control. By the end, you'll have the confidence and knowledge to build a wine cabinet that rivals store-bought options at a fraction of the cost.
Planning Your DIY Wine Cabinet
Before you cut a single board, careful planning ensures your project succeeds. Start by determining where the cabinet will live and how many bottles you need to store. A standard wine bottle is about 3 inches in diameter and 12 inches tall, but sizes vary — Champagne bottles are wider, and some Riesling bottles are taller. Always measure a few bottles from your collection to get accurate dimensions.
Key Planning Questions
- Location: Will it be a freestanding unit, a wall-mounted rack, or a built-in? Consider light exposure — direct sunlight damages wine. A spot away from windows and heat sources is ideal. If you're placing it in a dining room, it might pair well with built-in dining room cabinetry.
- Capacity: How many bottles? A small 12-bottle rack is perfect for beginners, while a 50-bottle cabinet suits serious collectors. Plan for growth — it's easier to build larger now than to expand later.
- Style: Modern, rustic, industrial, or classic? Your cabinet should complement existing decor. For a cohesive look, consider the cabinet style used elsewhere in your home.
- Budget: Plywood and pine keep costs low ($300–$600), while walnut or oak push the budget higher ($800–$1,200+). Hardware and finishes also affect the total.
- Features: Do you want a wine glass rack, a drawer for accessories, or LED lighting? Each addition affects the design and cost.
Pro Tip: Sketch your design on graph paper or use free online planning tools. Include front, side, and top views with exact measurements. This blueprint will guide every cut and assembly step, saving you time and costly mistakes.
Choosing the Right Wood
The wood you choose affects durability, appearance, and cost. Here's a quick comparison:
| Wood Type | Cost | Durability | Best For |
|---|---|---|---|
| Pine | $ | Moderate | Rustic, painted finishes, budget projects |
| Plywood (Baltic Birch) | $$ | High | Cabinet boxes, shelves, structural components |
| Oak | $$$ | Very High | Stained finishes, heirloom-quality pieces |
| Walnut | $$$$ | Very High | Luxury cabinets, rich dark tones |
| Maple | $$$ | High | Clean, modern looks, painting or staining |
For most DIYers, a combination of plywood for the cabinet box and solid wood for the face frame and trim offers the best balance of cost, stability, and appearance. If you're new to woodworking, pine is forgiving and affordable — perfect for a first project.
Materials and Tools You'll Need
Gathering everything before you start keeps your project running smoothly. Below is a comprehensive list for a standard 30-bottle wine cabinet measuring approximately 36 inches wide, 48 inches tall, and 14 inches deep.
Materials
- 3/4-inch plywood — 2 sheets (cabinet box, shelves, back panel)
- 1x2 and 1x3 solid wood — 20 linear feet (face frame, trim)
- 1/4-inch plywood or hardboard — 1 sheet (back panel)
- Wood glue — 1 bottle (Titebond II or III recommended)
- 1-1/4-inch wood screws — 1 box
- 1-1/2-inch brad nails — 1 box (for trim)
- Wood filler — 1 tube
- Sandpaper — 120, 180, and 220 grit
- Stain or paint — enough for 2 coats
- Polyurethane or lacquer — for topcoat protection
- Cabinet hardware — hinges, knobs, or pulls. For a cohesive look, browse appliance pulls and brass cabinet pulls for inspiration.
- Wine rack dowels or pre-made rack inserts — 1-inch dowels work well for bottle supports
Tools
- Circular saw or table saw
- Miter saw (for trim cuts)
- Drill/driver with bits
- Brad nailer (or hammer and finishing nails)
- Orbital sander
- Clamps (bar clamps and spring clamps)
- Tape measure, pencil, and square
- Safety glasses, ear protection, and dust mask
- Kreg Jig (optional but highly recommended for pocket-hole joinery)
Budget Note: If you don't own all these tools, many hardware stores rent them by the day. A basic circular saw, drill, and sander can handle this project if you're patient and precise. Pocket-hole joinery (using a Kreg Jig) simplifies assembly and creates strong joints without complicated joinery.
Step-by-Step: Building Your Wine Cabinet
Follow these steps carefully, and don't rush. Measure twice, cut once — it's the golden rule of woodworking. The entire build typically takes a weekend for a beginner, or a day for an experienced woodworker.
Cut the Cabinet Box Pieces
Using your blueprint, cut the sides, top, bottom, and shelves from 3/4-inch plywood. For a 30-bottle cabinet, you'll need two side panels (48" x 14"), one top and one bottom (36" x 14"), and three adjustable shelves (34.5" x 13.5"). Sand all edges smooth.
Assemble the Cabinet Box
Drill pocket holes along the edges of the top, bottom, and shelves. Apply wood glue to the joints, then screw the box together. Check for square by measuring diagonally from corner to corner — both measurements should match. Clamp and let dry.
Install the Back Panel
Cut the 1/4-inch plywood back panel to size. Nail or screw it to the back of the cabinet box. This adds rigidity and prevents racking. For a more finished look, inset the back panel into a rabbet cut along the rear edges.
Build the Face Frame
Cut 1x2 and 1x3 solid wood to create the face frame. Assemble using pocket holes or dowels. Attach the face frame to the front of the cabinet box with glue and brad nails. This frame adds structural strength and a professional look.
Create the Wine Racks
For a traditional rack, drill 1-inch holes in side supports spaced 3 inches apart, then insert dowels. Alternatively, build X-shaped or lattice racks using thin strips of wood. Ensure bottles rest at a slight angle to keep corks moist. For a more advanced look, consider glass-front cabinet doors to display your collection.
Sand, Finish, and Install
Sand the entire cabinet with 120, 180, then 220 grit. Apply stain or paint, then two coats of polyurethane. Install hinges, knobs, and any glass racks or LED lighting. Position your cabinet in its final location and secure it to the wall with anti-tip straps for safety.
Advanced Features to Elevate Your Wine Cabinet
Once the basic cabinet is built, you can customize it with features that make it truly special. These additions not only enhance functionality but also increase the value and visual appeal of your project.
Wine Glass Racks
Install a stemware rack beneath the top shelf or above the counter. Use 1x2 strips with evenly spaced slots, or purchase pre-made racks. Hanging glasses saves space and adds an elegant touch. For a cohesive kitchen design, consider how glass-front cabinets can complement your wine storage.
LED Lighting
Battery-operated or plug-in LED strip lights inside the cabinet create a warm, inviting glow. Choose warm white (2700K–3000K) to avoid damaging wine. Install lights along the underside of shelves or behind the face frame for a subtle backlight effect. If you're handy with electrical work, hardwired lights offer a cleaner look — similar to the approach used in curio cabinets with lights.
Temperature and Humidity Control
For long-term storage, wine thrives at 55°F (13°C) and 70% humidity. While a full climate-control system is complex, you can add a small thermoelectric cooling unit or a humidity sensor with a reminder to check levels. Insulating the cabinet with foam board helps stabilize temperature. For serious collectors, a dedicated wine fridge or a commercial under-counter fridge might be a better long-term solution.
Drawers and Accessory Storage
Add a bottom drawer for corkscrews, stoppers, and wine charms. Use drawer slide hardware for smooth operation. A pull-out shelf can also serve as a decanting station.
Design Inspiration: If you love the look of vintage furniture, consider adding antique cabinet details like turned legs or ornate trim. For a modern industrial vibe, industrial cabinet hardware and metal accents work beautifully. You can also explore mid-century bar cabinets for retro-inspired designs.
Maintaining Your DIY Wine Cabinet
A well-built wine cabinet will last for decades with proper care. Dust regularly with a soft cloth, and avoid harsh chemical cleaners that can damage the finish. If you stained the wood, reapply a thin coat of furniture wax or polish every 6–12 months. For painted cabinets, touch up chips promptly to prevent moisture damage. Keep the cabinet away from direct sunlight and heat sources to protect both the wood and your wine. If you notice any loose hinges or drawer slides, tighten screws and apply a small amount of wood glue to stripped holes. For more detailed care tips, refer to our cabinet care and maintenance hub.
Final Thoughts: Your DIY Wine Cabinet Journey
Building a DIY wine cabinet is a fulfilling project that combines craftsmanship, creativity, and practicality. Whether you're a novice woodworker or a seasoned pro, the process teaches valuable skills and results in a beautiful, functional piece you'll be proud to display. Remember to plan carefully, choose materials that suit your budget and style, and take your time during assembly. With the right tools and a bit of patience, you'll create a wine storage solution that protects your collection and enhances your home's ambiance.
Ready to start? Gather your materials, review the steps, and enjoy the journey. Your perfect wine cabinet is just a few cuts and screws away. For more cabinetry inspiration and expert guides, explore our shopping and reviews hub and style and design hub.
Recommended DIY Wine Cabinet Kits & Accessories
⚠️ AFFILIATE DISCLOSURE: This website contains affiliate links. As an affiliate Associate, we earn from qualifying purchases. If you make a purchase through these links, we may receive a small commission at no additional cost to you. Read our full affiliate policy.

X-cosrack Wine Bar Rack Cabinet with Detachable Wine Rack, Coffee Barwith Glass Holder, Small Sideboard and Buffet Cabinet with Mesh Door, Rustic Brown(Patent Pending)
Check price on Amazon
Loomie Wine Bar Cabinet with LED Lighted Liquor Bottle Display Shelf, Liquor Cabinet with Glass Holder, Coffee Bar for Liquor, Storage Buffet with Wine Racks, Wine Cabinet with Door (Black)
Check price on Amazon
X-cosrack 36 Bottle Wall Mounted Wine Rack, Modular Hanging Wine Rack for DIY Display, Detachable 3 Pack Wine Bottle Holder, Black Metal Storage Rack for Bar, Kitchen, Cellar, Restaurant
Check price on Amazon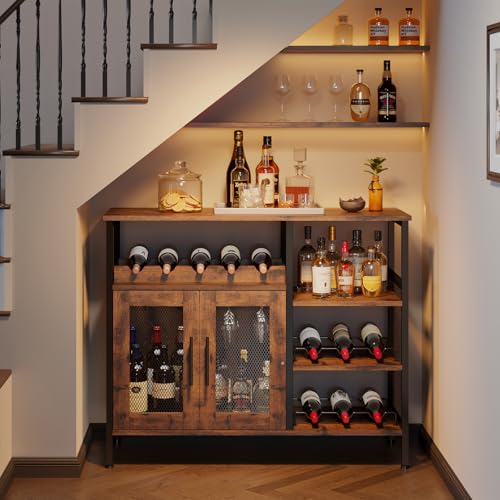
X-cosrack Wine Bar Rack Cabinet with Detachable Wine Rack, Coffee Bar Cabinet with Glass Holder, Small Sideboard and Buffet Cabinet with Mesh Door, Rustic Brown, Large
Check price on Amazon
Joaxswe Wine Bar Cabinet with Glass Door, 43" Blue Liquor Cabinet for Home | Wine Rack, Storage Shelf, Thick Base, Elegant Wood Grain, Modern Coffee Bar Cabinets for Living Room, Dining Room, Kitchen
Check price on Amazon
Wenceda Wooden Wine Rack, Stackable Wooden Wine Rack, Beech Wood Material Stackable Modular Wine Storage Racks, DIY Assembly Wine Bottle Holder for Inside Cabinet and Countertop (12-Bottle)
Check price on Amazon
Topwill 9 Bottles Wooden Wine Rack - Modular DIY Wine Bottle Holder, Freestanding for Countertop/Floor or Fits Inside Cabinet Stackable, Space-Saving Storage for Kitchen, Bar, Pantry
Check price on Amazon