
Cabinet Door Swap Guide: Transform Your Kitchen Fast
Discover how to replace your old cabinet doors with new ones. Save thousands on a kitchen remodel by learning the art of the cabinet door swap.
START YOUR SWAP💡 Did you know? A cabinet door swap is one of the most cost-effective ways to give your kitchen a completely new look without the expense and mess of a full cabinet replacement. You can transform your space for a fraction of the cost.
Are you tired of your outdated kitchen but don't want to spend tens of thousands of dollars on a full renovation? A cabinet door swap might be the perfect solution. By replacing only the doors and drawer fronts, you can achieve a dramatic transformation while keeping your existing cabinet boxes intact. This guide will walk you through every step of the process, from measuring and choosing new doors to installation and hardware upgrades.
Before you begin, it's helpful to understand the different cabinet types and how they are constructed. Most cabinets consist of a box (the frame and shelves), doors, and drawer fronts. A door swap focuses on replacing the visible exterior components, which are responsible for the majority of your kitchen's aesthetic. This is also a great opportunity to upgrade to features like soft-close hinges for a more modern feel.
Why Choose a Cabinet Door Swap?
Swapping cabinet doors offers a unique blend of affordability, convenience, and style. Here are the primary reasons homeowners choose this route:
✅ Pros of a Door Swap
- Cost-Effective: Save up to 70% compared to a full cabinet replacement.
- Fast Turnaround: Complete the project in a weekend rather than weeks.
- Less Mess: No demolition or major construction required.
- Eco-Friendly: Reusing cabinet boxes reduces waste.
- Style Upgrade: Easily change from raised panel to flat panel or Shaker style.
⚠️ Cons to Consider
- Box Condition: Your existing boxes must be structurally sound.
- Size Limitations: You are limited to the existing dimensions.
- Color Matching: May be tricky to match new doors to existing boxes if not refacing.
- DIY Skills: Requires precise measuring and basic installation skills.
Understanding Your Current Cabinets
Before ordering new doors, you need to understand what you have. Cabinets are generally categorized as either stock, semi-custom, or custom. The type you have will influence your options for replacement doors. You also need to identify the door overlay style:
- Full Overlay: The door covers the entire face frame. This is the most common style in modern kitchens.
- Half Overlay: The door covers part of the face frame, leaving some of it visible.
- Inset: The door sits flush inside the face frame. This is common in vintage or high-end custom cabinets.
Knowing your overlay style is critical because it determines the hinge type and the size of the replacement doors you need to order.
How to Measure for Your New Cabinet Doors
Accurate measurements are the most important part of a successful cabinet door swap. A mistake here can be costly. Follow these steps carefully:
-
Measure the Cabinet Opening
Measure the width and height of the cabinet opening (the face frame opening) at the narrowest point. Do this for every single door and drawer.
-
Determine the Overlay
Measure how much the existing door overlaps the opening. For a full overlay, this is typically 1/2 inch on all sides. For a half overlay, it might be 1/4 inch or 3/8 inch.
-
Calculate the Door Size
Add the overlay to the opening dimensions. For example, if your opening is 15" wide and you have a 1/2" overlay, your new door should be 16" wide. Always double-check with the door manufacturer's guidelines.
-
Check for Hardware Clearance
Ensure your new doors won't interfere with adjacent cabinets or appliances. This is especially important in small kitchens or corner cabinets.
Choosing the Right Replacement Doors
The fun part of the swap is choosing your new style. Consider the overall design of your home. A modern kitchen might look best with sleek flat panel doors, while a farmhouse kitchen often features beadboard or Shaker profiles. You also have a choice of materials:
| Door Material | Best For | Price Range (Per Door) |
|---|---|---|
| MDF (Painted) | Modern, clean lines, budget-friendly | $50 – $120 |
| Plywood with Veneer | Contemporary, durable, mid-range | $80 – $180 |
| Solid Wood (Oak, Maple, Cherry) | Traditional, rustic, high-end | $120 – $300+ |
| Thermofoil | Moisture resistance, smooth finish | $60 – $140 |
Don't forget the hardware! New pulls and knobs can dramatically change the look of your cabinets. Consider the finish (brushed nickel, matte black, brass) and the style (bar pulls, cup pulls, round knobs) to complement your new doors. This is also the perfect time to upgrade to soft-close hinges if you haven't already.
Step-by-Step Installation Guide
Once your new doors arrive, it's time to install them. This process is straightforward but requires patience and precision. For a more detailed look at the installation process, refer to our general cabinet installation guide.
-
Remove Old Doors and Drawer Fronts
Start by removing all existing doors and drawers. Label each one with a piece of tape and a marker (e.g., "Top Left," "Drawer 1") to keep track of where they belong. Remove the hinges from the doors and the cabinet frame.
-
Prepare the Cabinet Boxes
Clean the face frames thoroughly. If you are also replacing the hinges, now is the time to fill old screw holes with wood filler and sand them smooth. This ensures a clean surface for the new hardware.
-
Install New Hinges on Doors
Following the manufacturer's instructions, attach the new hinges to your new cabinet doors. Use a screw type appropriate for your door material. A level and a jig can help ensure consistency.
-
Attach Doors to Cabinet Frame
With a helper, hold the door in place and screw the hinge plate into the cabinet face frame. Start with one screw per hinge, check the alignment, and then add the remaining screws. Adjust the hinges as needed to ensure the doors are level and evenly spaced. If you run into issues, our guide on cabinet door alignment can help.
-
Install Drawer Fronts
Attach the new drawer fronts to the existing drawer boxes using the appropriate screws. Ensure they are centered and aligned with the doors above or below them.
-
Add Hardware
Finally, install your new cabinet hardware. Use a template to ensure consistent placement across all doors and drawers. Consider adding bumpers and pads to protect your new doors from slamming.
Caring for Your New Cabinet Doors
After your swap, proper care will keep your new doors looking great for years. Regular surface cleaning with a soft cloth and mild soap is usually sufficient. For stubborn marks, refer to our guide on sticky residue removal. Avoid harsh chemicals that can damage the finish. To protect your investment, consider our tips on paint protection and humidity control, especially in kitchens and bathrooms.
Frequently Asked Questions
Can I swap just the doors and not the drawer fronts?
Yes, you can, but it's usually best to replace both for a cohesive look. Mixing old and new can be noticeable, especially if the finishes have aged differently.
Do I need to replace the hinges too?
It's highly recommended. New doors often require different hinge types (e.g., full overlay vs. half overlay). Upgrading to soft-close hinges is a popular and worthwhile upgrade during a door swap.
How long does a cabinet door swap take?
For an average-sized kitchen, the installation itself can be completed in a weekend. However, ordering custom doors can take several weeks, so plan accordingly.
Can I paint my existing doors instead of swapping them?
Yes, painting is an option. However, if your doors are damaged, outdated in style, or you want a different door profile, a swap is a better choice. Painting is more about changing color; a swap changes the entire look. See our cabinet repainting guide for more details.
Final Thoughts
A cabinet door swap is a powerful DIY project that can revitalize your kitchen or bathroom without breaking the bank. By carefully measuring, choosing the right style and materials, and following our installation steps, you can achieve a professional-looking result. Remember to consider upgrading your hardware and hinges for a complete refresh. If you're still unsure about the process, you can always consult a professional, but for many homeowners, this is a rewarding and manageable project. For more inspiration, explore our style and design hub.
Recommended Cabinet Doors & Hardware for Your Swap
⚠️ AFFILIATE DISCLOSURE: This website contains affiliate links. As an affiliate Associate, we earn from qualifying purchases. If you make a purchase through these links, we may receive a small commission at no additional cost to you. Read our full affiliate policy.

Hardwood Track and Upper Guide - Cabinet Sliding Door Track & Guide for 1/4" Sliding Plywood, Hardwood, Glass, or Pegboard Cabinet Doors - Easy to Install Stain Matcher Closet Door Rail
Check price on Amazon
Cabinet Hardware Jig, Punch Locator Drill Guide,Wood Drilling Dowelling Guide for Installation of Handles Knobs on Doors and Drawer, Cabinet Template Tool for Handles and Pulls
Check price on Amazon
Drill Mounting Template for Kitchen Cabinet Pulls Kitchen Knobs,1 Pack | Drill Bit Included, Handles Drill Template Guide, For Drawer Pulls,Cabinet Knobs, Kitchen Hardware Installation
Check price on Amazon
King&Charles Cabinet Hardware Jig&Auto Center Punch&Point Drill Bits | For Handle Knob Pull on Drawer/Door, Wood Drilling Dowelling Guide Set. Cabinet Handle Jig
Check price on Amazon
WORKPRO Cabinet Hardware Jig, Adjustable Cabinet Handle Template
Check price on Amazon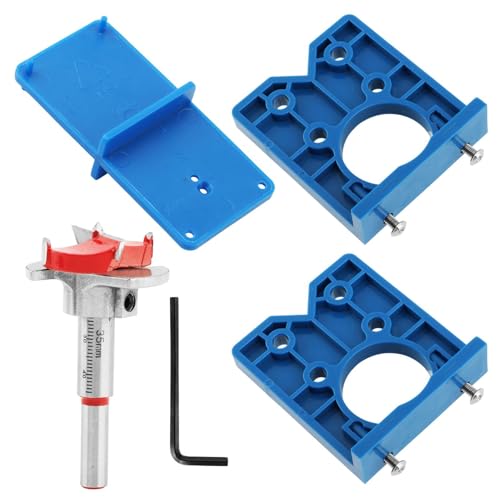
35mm Concealed Hinge Jig Kit, Aluminum Alloy + Plastic Drill Guide Template, Quick Center Location to Reduce Misalignment, for Cabinet Door Woodworking, Includes Drill Bit, Hex Key, Locator Plates
Check price on Amazon